
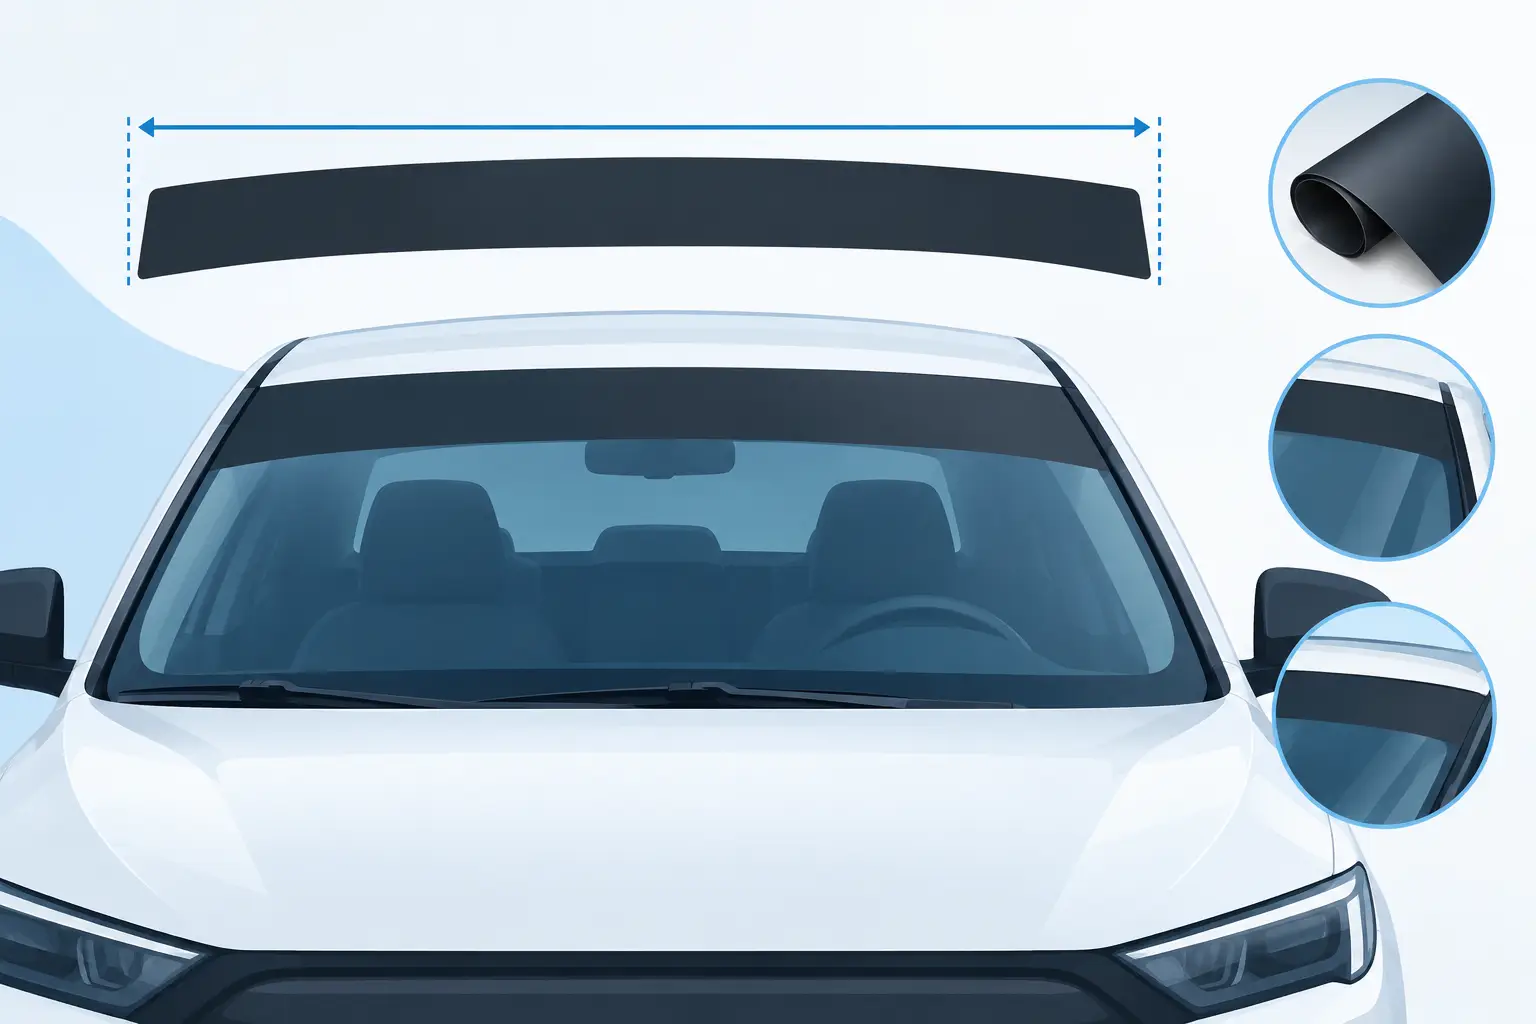
A windshield banner can look factory-clean or completely out of place based on one detail: the size. This windshield banner sizing guide shows you how to measure the top of your glass, select a height that fits your vehicle, and keep your lettering readable without taking over the windshield.
The right banner should follow the windshield’s upper contour, sit flat across the glass, and make its point quickly. Whether you are adding a race team name, business branding, a club logo, or a personal statement, start with measurements – not a guess based on another vehicle.
Start With the Banner’s Job
Before measuring, decide what the banner needs to do. A bold race car windshield banner may need maximum impact from the stands. A contractor’s truck may need a company name that stays visible at a jobsite without blocking the driver’s view. A weekend build may only need a subtle strip of lettering across the top.
That purpose affects both height and layout. Larger text is easier to read at a distance, but a taller banner can crowd the driver’s sightline. A low-profile banner looks sharp and leaves more glass open, but it limits how much copy you can fit. There is no one-size-fits-all measurement because windshield angle, roofline, glass width, and the message itself all change the answer.
For most vehicles, the best approach is to use as much width as the glass allows while keeping the height conservative. Width gives lettering room to breathe. Height is where visibility and local regulations become the deciding factors.
How to Measure a Windshield Banner Correctly
Measure the windshield where the banner will actually be installed: along the upper portion of the exterior glass, not across the roofline and not from one A-pillar to the other. Windshields curve, taper, and often have black ceramic frit borders that can change the usable area.
Clean the outside of the windshield first so you can clearly see the edge of the glass and any factory tint strip. Then use a flexible tape measure. A cloth sewing tape works well because it follows the slight curve across the top of the windshield better than a rigid ruler.
Measure the usable width
Place the tape at the left edge of the area where you want the banner to begin and run it to the right edge. For a full-width banner, measure just inside the windshield edges rather than onto the rubber molding. Leave a little margin at each end if the glass narrows sharply near the corners.
Do not assume the top edge and lower edge of your banner area are the same width. On many cars and trucks, the glass gets wider as you move down from the roof. If you plan a taller banner, take a second width measurement at the bottom of the planned banner height. Use the smaller number as your safe maximum width.
Measure the maximum practical height
Next, measure down from the top edge of the glass to the lowest point you are comfortable covering. This is the step where restraint pays off. Sit in the driver’s seat and look through the windshield before finalizing the height. A banner that seems modest from outside can sit directly in your forward view from behind the wheel.
A practical starting range is about 4 to 6 inches tall for many passenger vehicles and trucks. Shorter banners around 3 inches work well for simple names, websites, or compact logos. Taller banners can make sense on large, upright windshields, competition vehicles, and vehicles used primarily off-road or on private property, but only after confirming visibility and applicable rules.
Write down more than two numbers
Your final order size depends on the glass shape as well as the width and height. Record the vehicle year, make, and model; top width; width at the bottom of the planned banner; desired height; and whether the windshield has a factory tint strip, camera, sensor, or antenna area near the top.
Those details prevent a common mistake: ordering a straight rectangular banner for a windshield with a dramatic curve or a narrow upper section.
Common Windshield Banner Size Ranges
These ranges are useful starting points, not measurements to order without checking your own glass.
Compact cars often take banners around 42 to 52 inches wide. Sedans, coupes, and many crossovers commonly land between 48 and 60 inches wide. Full-size pickups, SUVs, vans, and larger work trucks may need 60 to 72 inches or more, especially when the banner spans most of the upper windshield.
Height usually matters more than people expect. A 3-inch-high banner creates a clean, understated look and works best with short lettering. A 4- to 5-inch banner gives most names and business messages enough presence to read well. At 6 inches and above, the banner becomes a major visual element. It can look right on a lifted truck, race vehicle, or tall windshield, but you need to check sightlines carefully.
If your measurement falls between standard sizes, size down rather than up. A banner that stops slightly short of the glass edge usually looks intentional. One that runs into molding, curves into a corner, or covers too much glass does not.
Choose Lettering That Fits the Space
Banner dimensions and lettering design work together. A wide windshield does not automatically mean you should use huge letters. The word count, font style, spacing, and color contrast all determine whether the finished banner reads cleanly.
Short names and single words can use larger lettering and bolder fonts. A racing number, team name, or one-word brand has room for taller characters and a stronger visual style. Longer business names, social handles, and slogans need a more disciplined layout. Consider a narrower font, reduced letter height, or a second line only if the banner height supports it without becoming too tall.
Avoid squeezing too much copy into one line. Letters packed tightly together lose impact from a distance, especially on dark glass. Give the design some breathing room at both ends. A banner does not need to fill every inch to look custom.
Color also affects readability. White, bright yellow, silver, and lighter colors generally stand out well on tinted or dark windshield glass. Black lettering can disappear against dark tint. Specialty effects can add style, but high contrast should remain the priority when the banner needs to be seen quickly.
Account for Curves, Tint Strips, and Windshield Features
Many windshields have a black dotted frit band around the perimeter. Vinyl can install over this area, but the textured surface may affect how smooth the edge looks compared with clean glass. If you want the cleanest appearance, position the banner so its main lettering stays on smooth glass and let any background strip or outer edge cover the border only where needed.
Factory tint strips can be useful because they create a natural visual zone for a banner. They can also reduce contrast if you choose dark lettering. Test the color choice against the actual tint before committing to a design.
Modern vehicles may have forward-facing cameras, rain sensors, lane-assist hardware, or antenna elements near the rearview mirror. Do not cover these components. Leave a planned gap if necessary, or use a split layout with lettering on both sides of the center area. That small adjustment is better than interfering with vehicle functions or creating a cluttered-looking install.
Check Visibility and Local Rules Before Ordering
Windshield decal rules vary by state and can depend on banner height, placement, tint, and whether the vehicle is used commercially. A banner that works at a track event may not be appropriate for a daily-driven street vehicle. Commercial operators may also have additional requirements tied to inspections, fleet policies, or safe operation.
Keep the banner high on the windshield, preserve a clear forward view, and check the rules where the vehicle is registered and driven. When in doubt, choose a shorter height and a high-contrast design. You can still create a strong look without turning the upper windshield into a blind spot.
Order for the Finished Look You Want
When building your banner, enter the measured width and height, then preview the lettering as a complete layout. Look for crowded edges, tiny details, and excessive copy. If the design feels busy in the preview, it will feel even busier on the glass at highway speed.
For a clean installation, apply the banner to a cool, clean, dry windshield. Take your time centering it and work from the middle outward to reduce trapped air. A properly sized banner is much easier to install because you are not fighting moldings, sharp curves, or last-minute trimming.
At eDecals.com, you can build a custom windshield banner with the size, font, color, and layout that fit your vehicle and your purpose. Measure once, keep the message clear, and give your windshield graphic enough room to make an impression without getting in the way.