|
BEFORE YOU BEGIN:
– All products are designed for installation on the outside of the vehicle.
– Required Items include an installation squeegee (included), masking tape, glass cleaner, dry paper towels, measuring tape or ruler.
– Do not apply any vinyl graphics in direct sunlight. Make sure it is between 60 degrees and 80 degrees F
– Do not store unapplied graphics in direct sunlight – damage may occur.
– All dirt, grease and wax must be removed from the car surface before the decal is applied. This includes wax from mechanical car washes, rain-x, compound, etc. Failure to take this step may result in the decal not sticking to the vehicle surface.
DRY APPLICATION vs WET APPLICATION:
We suggest installing all graphics using the dry application method shown here. . Installing it dry will insure that the decal stays adhered to the vehicle surface, while wet application may cause the decal to not adhere to the vehicle surface. If installing it wet, NEVER use soapy water, only use normal water. We only support our products when installed dry.
| STEP 1 – UNPACK THE SHIPPING CONTAINER |
 |
Remove decals from packaging. Lay decals flat on a smooth table in an area that is at least 60° F and below 80° F.
PLEASE NOTE: These full color decals need special attention during installation and during the lifetime of the decals. The color is printed onto traditional self adhesive vinyl material and is made to say vibrant and clear for years to come. You must follow these instructions properly in order to maintain the decals after installation. This is a custom made graphic which is non refundable, non returnable and may need to be trimmed during installation. These and all of our products are triple inspected before shipping to insure no defects. Check your order for damage during shipment within 3 days. Check with your state’s laws regarding installation of this or any vinyl graphic materials to a vehicle’s windows or paint. |
|
Inspect decals for damage during shipment. We double-check all orders are checked prior to shipment for damage. Any damage incurred during shipping must be reported to us within 48 hours.
|
| STEP 2 – GO OVER THE DECAL WITH THE SQUEEGEE |
|
To ensure that the decal is properly stuck to the transfer tape covering before installing the decal, take the squeegee application tool and press firmly over the whole surface of the face of the decal while it is still laying flat on the table. |
|
Most of our products have a vinyl border on both sides of the graphic. This helps keep the transfer tape on the graphic prior to installation. This border can be removed prior to installation of the decal, or after the decal has been applied.
|
| STEP 3 – PREPARE THE SURFACE |
 |
The most important step during decal installation is making sure the installation area is clean and dry. Make sure there is NO WAX, RAIN-X, COMPOUND, lint, dust, or other residue on the surface. Remove all wax, compound residue, car wash protectant, etc with PREP-SOL, laquer thinners, brake cleaner, 409, Fantastic, etc. After cleaning the surface, go over the surface with regular glass cleaner. Wipe it dry. |
|
All waxes, oils, and polish must be removed from the vehicle surface to insure that the decal will stick properly Make sure the area is at least 60° F and no hotter than 80° F.
|
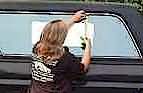
| STEP 4 – PLACE THE DECAL |
| Temporarily place the decal in the desired location with two small pieces of masking tape (one on each upper corner of the decal) holding the decal to the vehicle surface. With a tape measure or yard stick, align the decal with the window or body section. |
 |
|
Once the decal is aligned to the vehicle, stand back and look at the decal. it should be level with respect to the ground. Adjust as necessary.
|
| STEP 5 – SECURE THE DECAL |
 |
Apply a long piece of masking tape along the top of the decal with approx half of the tape on the decal and half on the vehicle surface. This will make a large hinged ‘flap’. |
|
The hinged flap will make installation much easier. For long thin designs, you can cut the decal in half (up and down between the lettering) once it has been taped to create two flaps for even easier installation.
|
| STEP 6 – OPTIONAL-DIVIDE UP THE DECAL |
|
To make installation easier for large or long decals, you can create several smaller flags out of the one large flap by cutting vertically up the decal as shown in Figure C. Using a pair of scissors or a razor blade, but be sure not to cut into the actual vinyl portion of the graphic. Once this is accomplished, you will have individual flaps instead of one whole surface to install. |
|
This option is only possible for decals that have space between letters. (Such as windshield decals that do not have connected script letters)
|
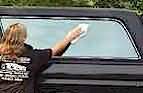
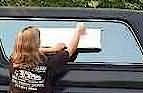
| STEP 7 – START REMOVING BACKING PAPER |
| Raising the large hinged ‘flap’, and begin to peel the wax paper backing off the decal (exposing the sticky side fo the decal). Be sure to only expose half of the decal. DO NOT ALLOW THE STICKY PART OF THE DECAL TO TOUCH THE VEHICLE SURFACE. |
 |
|
For multiple hinged ‘flaps’, repeat this procedure for each. Peeling the backing paper only half way down will allow you to keep the decal away from the vehicle surface until necessary.
|
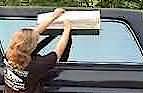
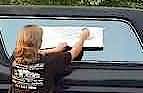
| STEP 8 – BEGIN DECAL APPLICATION |
 |
With the wax paper backing peeled half way downward, begin to apply the sticky side of the decal to the vehicle surface with the Free application tool enclosed. Besure to use even strokes horizontally across the decal. ONLY APPLY THE FIRST HALF OF THE DECAL. |
|
The application squeegee should have a sharp even edge. The tool should be angled 45 degrees away from the center of the decal. This will keep bubbles from forming between the decal and the vehicle surface.
|
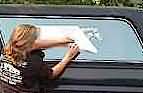
| STEP 9 – CONTINUE INSTALLATION |
| Continue smoothing out the decal with long hoizontal strokes, starting at the top and working towards the bottom. Continue to remove the backing paper as needed. |
. |
|
Only remove the wax paper backing as needed. The sticky side of the decal should be covered until installation. This will keep it from getting dirty and sticking to the vehicle surface prematurely.
|
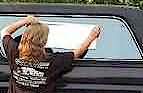
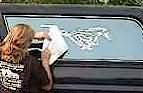
| STEP 10 – SQUEEGEE AND BEGIN TAPE REMOVAL |
 |
Once the entire sticky side of the decal is applied to the vehicle, go over the decal with the application squeegee, with increasingly harder strokes. Then begin peeling the transfer tape covering the decal. |
|
The transfer tape covering is made of paper with a sticky backing. This must be removed after the decal is installed. The vehicle surface must be proper temperature for this tape to be removed easily.
|
| STEP 11 – FINISH INSTALLATION |
| Finish removing the transfer tape covering, peeling from one side to the other. Any small bubbles can be removed using a small razor blade. Take the razor blade and poke a small hole in the vinyl at the source of teh bubble. Then with the squeegee, push the remaining air out of the bubble. |
. |
|
Most bubbles will dissipate within 3 weeks of installation due to sunlight.
|
| CARE AND MAINTENANCE |
| Your new vinyl decal is now installed! To keep it looking new, simply wash it whenever you wash the vehicle. You can apply wax or RainEx over the decal once it is applied. your new decal will give you years of great looks. If you are in cold climate be careful when using an ice scraper on any surface where decals are applied.
PLEASE NOTE: These full color decals are made using a printing process where solvent ink is fused to standard self adhesive vinyl material. This process allows the ink to remain on the vinyl material for up to 3 years without fading or cracking. You must be careful not to use harsh chemicals on the full color decals. This will damage the decals. We recommend you wax over the decals after installation using a non solvent paste wax. DO NOT USE LAQUER THINNERS, 409, FANTASTIC, SUPER CLEAN OR OTHER HARSH CHEMICALS TO CLEAN THE GRAPHICS. DAMAGE MAY OCCUR. |
All of our products are custom made to order. There are no refunds, no exchanges and no returns on any of our products. If you destroy the decal during installation, we may offer you a replacement at a reduced cost. In order to qualify for a lower cost replacement, you must send us the damaged decal. Management reserves the right to modify this policy.
This page is protected by U.S. and International Copyrights. Any duplication or distribution of this information in any form is illegal. We have successfully prosecuted content theft in the past and aggressively pursue violators. The information has been imbedded with searchable phrases which can be traced to any website using them.
|
